 Back to Silver Drawing Tests
Development
Techniques
Techniques
Ability
to Sequence
Class # 2: PAINTING
Class # 5. PREDICTIVE DRAWING OR
PAINTING
Spatial
Ability
Class # 4: DRAWING FROM
OBSERVATION
Developing
Concepts
Developing Concepts Through Modeling Clay
Class # 1: DRAWING FROM
IMAGINATION
Class # 3: DRAWING AND PAINTING
Copyright 1983/1990/1996 by Rawley Silver, reprinted with permission
from its original publication.
No portion of this work may be copied without written consent by Rawley Silver.
The following are excerpts from
Silver, R. A. (1996). Silver Drawing Tests of cognition and emotion. Sarasota, FL: Ablin Press.
Developmental Techniques
This chapter ties assessment to intervention by presenting techniques and procedures for developing the concepts assessed by the SDT. These interventions were originally developed in a doctoral project (Silver, 1966), then a demonstration project in art education for hearing-impaired children and adults, supported by a grant from the U.S. Office of Education, Bureau of Research (Silver, 1967). They were further developed in the State Urban Education Project (Silver, 1973) and the National Institution of Education Project (Silver et al, 1980) discussed in Chapter 5.
In this approach, art techniques are demonstrated, then students are asked to solve conceptual problems using the techniques. Three procedures are presented below. Others are outlined in Appendix C.
page103.
Copyright 1996 Rawley Silver
Developing Ability to Sequence Through Painting
Materials: Blue, red, yellow, and white poster paints, palettes (or white paper 12" x 18"), brushes, and painting knives (or less flexible palette knives or flat sticks); also water dishes, paper towels and sponges for cleaning up, aprons or old shirts for protecting clothes, and newspapers for protecting tables and floors.
Demonstrate mixing a series of tints by placing a dab of white paint on the upper right corner of a sheet of paper, and a dab of blue on the upper left. With the painting knife, mix a series of tints between the dabs from left to right, by adding more and more white to tints of blue.
Then ask your students to put dabs of white and a chosen color in the upper left and right corners of their palettes, then mix a sequence of tints between them. Later, ask them to add the remaining colors to the other corners of their palettes and encourage them to create sequences of pink, purple, orange, and green, both around and within their palettes.
After this introduction, encourage your students to discover and invent colors of their own by painting images or abstractions. Whenever they add more of one color to another, they create a sequence. Later on, provide black paint so that they can discover shades as well as tints. There is no need for additional colors because virtually all can be mixed from red, yellow, blue, black and white.
page 103.
Copyright 1996 Rawley Silver
Materials: paper palettes, palette knives, red, blue, yellow, white poster paint water, paper towels, paper 9" x 12" and 12" x 18", scissors or straight edges.
| Objectives | Procedures |
| 1. develop ability to order sequentially by | asking students to mix sequences of colors |
| a. focus attention on sequencing by | setting limits on colors, art materials, and talking; avoiding distractions and interruptions; and demonstrating how to mix a series of blue tints. |
| b. elicit sequential thinking by | asking students to put a dab of white on the right
corner of their palettes, blue on the upper left, then mix a series of tints between them
by adding more and more white to tints of blue. Next, add a dab of red to the lower right
corner, and after sequencing a series of pinks and purples, add yellow to the lower left
comer, mixing greens and oranges. Whether or not a student succeeds in sequencing, limit the time for this task to about 10 minutes. The rest of the time is spent painting spontaneously, either inventing colors and shapes or painting pictures. |
| c. reinforce sequential thinking by | providing kinetic as well as visual activities, time for quiet reflection while working and, toward the end of the period, discussion. Introduce instructional "games" #2 and/or 3. |
| 2. invite exploratory learning and associative thinking by | asking students to find out for themselves what leads to what and asking them to select and combine |
| 3. develop painting skills, intensify discrimination of color nuances by | emphasizing form rather than content |
| 4. develop creative abilities by | showing appreciation of explorations and discoveries |
| 5. build self-confidence by | keeping task time short, undirected time long; avoiding anxiety and frustration, showing appreciation of effort |
| 6. assess ability to sequence at the outset by | completing activity log, photographing key paintings, dating and numbering all (signed) paintings |
| 7. set the stage for transfer by | making the art experience so rewarding that students will spontaneously use what they learn in their own ways for their own purposes in other situations. |
page 136.
Copyright 1980/1996 Rawley Silver
Class # 5. PREDICTIVE DRAWING OR PAINTING
Materials: toy boat ( � bottle cork, toothpick mast, wire sail, plasticene keel); 8" glass jar filled with enough blue-tinted water to float the boat; plumbline (string weighted with a lump of clay) suspended for a stick: art materials of choice
| Objectives | Procedures |
| visualize, and horizontal and vertical concept by | asking students to predict changes in appearance, then test out predictions and draw them |
| a. focus attention on horizontalality by | asking, "what will happen to the boat if we tilt the jar?" Ask them to sketch their predictions, then take turns tilting the jar held above eye level. Then prop the jar on a lump of clay so that the water surface is parallel to table surface, and ask students to draft from observation. Do not correct mistakes. |
| b. focus attention on verticality by | asking students to guess how the "fishing line" would look when the pole is tilted in various positions, then take turns suspending the string next to a vertical object such as a door frame. The vertical parallels should be clearly visible as the stick is moved up and down. Again, do not mention this or point out mistakes. |
| c. elicit thinking and reinforce by | asking students to draw or paint a picture of someone fishing |
| 2. invite exploratory learning and transfer by | asking students to find answers for themselves. Answer questions with, "what do you think?" or "is something wrong?" Limit manipulations to a few minutes, leaving most of the time free for reflection without interruptions or distractions. |
| 3. build self-confidence and creativity by | showing appreciation of personal involvement regardless of ability to learn the concepts |
| 4. assess ability by | recording observations and photographing or xeroxing key drawings or paintings, dating and numbering all drawings or paintings |
page 139.
Copyright 1980/1996 Rawley Silver
Developing Spatial Abilities Through Drawing from Observation
Materials: an orange or small ball, cylinders made from rolling and taping sheets of construction paper in different colors and sizes, white drawing paper, and pencils with erasers, felt-tipped markers, or colored chalks.
Place the orange and one (or more) cylinders on a sheet of paper in the center of a round table, or on a low table surrounded by desks and chairs. Place the objects side by side on the paper, one further forward than the other. This arrangement should be below eye level so that the paper base is seen as a plane.
Demonstrate drawing from observation with a quick sketch, then ask children to draw the arrangement, including the paper base. As they finish, ask them to change seats with classmates on other sides of the arrangement, and sketch again. Do not call attention to mistakes. Instead, call attention to spatial relationships, such as, the orange appears to the left of the cylinder and in the foreground from here, but to the right and in the background from over there.
If a child (or adult) has difficulty drawing from observation, sit beside him or her so that you share the same point of view. Then draw the arrangement slowly, calling attention to spatial relationships and the line formed by the back edge of the table which can serve as a frame of reference. Severely handicapped patients may find it helpful to place a hand over yours as you draw.
In later classes, provide other objects to draw from observation. Include portraits of classmates from different points of view and self-portraits while looking in mirrors.
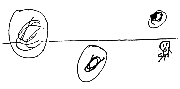
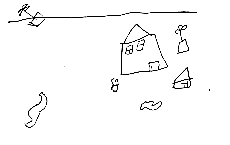
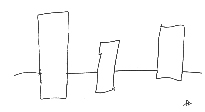
The combination of focusing attention on an arrangement of objects, then drawing the arrangement, without instructions or interruptions, seems to bring about improvement spontaneously. To illustrate, a sequence of three drawings by a language-impaired child is shown in Figure 41.
FIGURE 41. Drawings from Observation by Ben, age 14, expressive language impairments and poor visual-motor coordination
Ben's first attempt, drawing an arrangement of three cylinders and a toy bug
Ben's second attempt, drawing a toy landscape.
Ben's third attempt, drawing the same arrangement of cylinders and toy bug.
page 104-105.
Copyright 1996 Rawley Silver
Class # 4: DRAWING FROM OBSERVATION
Materials: an orange, apple, and blue cylinder (differing in size from the test cylinders); paper 8 � x 11" to serve as a base for the arrangement; toy house and animals; felt pens in orange, blue, green, red, craypas.
| Objectives | Procedures |
| 1. develop ability to perceive and represent concepts of space by | asking students to draw the orange and cylinder placed on the base (the orange to the left and about 1 inch forward) in the center of a large table or center of the room, below eye level. |
| a. focus attention on spatial relationships by | limiting subjects to two simple shapes and limiting art materials. |
| b. elicit spatial thinking by | asking students to draw the arrangement then change seats with classmates so that the objects are seen in reverse, then from other positions. After these drawings, add the apple placed further forward than the other objects |
| c. reinforce spatial thinking by | asking students to set up toy landscape arrangement and draw or paint from observation (choosing their art materials and size of paper). Finally, discussion. |
| 2. invite exploratory learning by | not pointing out mistakes or trying to prevent mistakes
but directing attention with comments such as, "is that the way you want it?
Are you sure?" Be alert for frustration, however, and demonstrate sketching as needed. For a student who has much difficulty, place his/her hand over yours as you draw, then take turns. When interests flag, ask for family portraits. Follow landscape house with "show who lives in your house with you".
|
| 3. build self confidence by | showing appreciation when student discover mistakes or persist or improve; present the task as a challenging game rather than an obligation; emphasizing rewards and strengths |
| 4. assess each student's needs by | including observations in activity log, dating and numbering each drawing, photographing or xeroxing key drawings |
| 5. set the stage for transfer by | making the experience so rewarding that students will spontaneously use learning elsewhere for their own purposes |
page 138
Copyright 1980/1996 Rawley Silver
Developing Concepts Through Drawing from Imagination
Materials: stimulus drawings, drawing paper, and pencils, chalk, marking pens, or painting materials.
The stimulus drawings in Form B can be used for developing concepts as well as for amplifying assessment. To develop concepts of class inclusion, cut apart the stimulus drawings and present them as cards grouped in categories of people, animals, and places. Ask respondents to choose cards from different groups and combine their selections into narrative drawings. As they finish drawing, ask them to return the cards "where they belong." Mix the cards and ask respondents to put together those that belong together.
page 104
Copyright 1996 Rawley Silver
Developing Concepts Through Modeling Clay
Materials: earth clay (or plasticene), modeling tools (or pencils, paper clips, sticks), wire for cutting clay into lumps, and plastic bags for storing sculpture. In advance, prepare a fist-size lump of clay for each student and for yourself.
Demonstrate rolling a small piece of clay with the palm of your hand on the table surface until it becomes a "ball" or a "snake," then ask the children to make balls or snakes of their own.
To develop ability to sequence, ask them to make larger and smaller balls, or longer and shorter snakes, by adding clay and pinching it off.
To develop spatial abilities, demonstrate the "slab" technique - rolling out clay like dough, cutting it into rectangles, then pinching the rectangles together to make boxes, houses, or other three-dimensional forms.
To develop ability to select, combine, and represent, demonstrate the "brick" technique - forming small blocks of clay and pressing them together to build human or animal forms. Taking a pinch of clay from here and adding it there seems to develop ideas of conservation.
Sonstroem (in Bruner, 1980) devised an effective technique for developing ability to conserve. Ask non-conservers to make two balls the same by pinching off clay from one ball and adding it to the other. When the child is satisfied that they are the same, ask him or her to roll one ball into a snake, then again ask whether they still have the same amounts or whether there is more clay in the ball than in the snake. Ask those who continue giving nonconserving answers, to change the snake back into a ball, and with eyes closed and a ball in each hand, compare them again. After each alteration, ask them to judge amounts of clay and explain their answers. The combination of labeling, manipulating, and reversing seems to lead to discovering that the amount of clay does not change with a change in its shape.
page106.
Copyright 1996 Rawley Silver
Class
# 1: DRAWING FROM IMAGINATION
Appendix C
Developmental Techniques
National Institute of Education Project #79 0081
Materials: pencils, pens, paper 9" x 12", stimulus cards group A (people), Group B (animals), Group C (objects)
| Objective | Procedures |
| 1. Improve ability to associate and form groups on the basis of class or function by | asking students to select images, combine them in a drawing, then represent their associations, at first nonverbally, by making the drawing tell a story, then verbally by telling the story or giving it a title. |
| a. focus attention on associations by | setting limits on subject matter, art materials, and talking, avoiding distractions and interruptions, and presenting and demonstrating the following task |
| b. elicit associative thinking by | presenting stimulus cards in three groups, asking students to select two cards from different groups, and draw a picture about the subjects selected. Demonstrate by selecting the lion and the boy climbing, then quickly sketch the lion awaiting the boy at the top and ask students to select other cards (but not copy them). |
| c. reinforce associative thinking by | providing kinetic as well as visual activities, time for quiet reflection while drawing, then soliciting verbal associations by asking what is happening in the drawings. Introducing instructional "game" # 1. |
| 2. Develop visual articulation and expressiveness by | emphasizing communication through narrative drawing, content rather than form |
| 3. Develop creative abilities by | showing appreciation of originality and expressiveness, keeping task open ended, providing challenging experience |
| 4. Build self-confidence by | emphasizing strengths rather than weaknesses, avoiding incidents that might cause anxiety or embarrassment |
| 5. Assess ability at the outset and obtain clues to interests and perceptions of self and others by | scoring first drawings on 1-5 scale (see test), recording observations in activity log and notes, photographing or xeroxing key drawings, dating and numbering all (signed) drawings |
| 6. set the stage for transfer by | making the art experience so rewarding that students will be tempted to use what they learn in their own ways for their own purposes in other situations. |
page 135.
Copyright 1980/1996 Rawley Silver
Class # 3: DRAWING AND PAINTING
FROM IMAGINATION
Materials: stimulus cards Group D (places) and art materials of choice
| Objectives | Procedures |
| 1. improve ability to form concepts by | asking students to draw or paint images in space |
| a. focus on spatial associations by | setting limits on spatial associations and avoiding distractions and interruptions |
| b. expand awareness of objects in-space and elicit associations by | holding up 1 stimulus card at a time and ask, "have you ever been to the beach? A farm? etc. What is it like?" Ask students then to draw or paint a picture that shows where the story takes place (their own places rather than the cards). |
| c. reinforce associative thinking by | providing kinetic and visual activities, time for quiet reflection, and time toward the end of the art period for group discussions and display of the work of each student, including titles. |
| 2. develop visual articulation and painting skills by | showing appreciation of both form and content |
| 3. develop creative abilities by | showing appreciation of originality, expressiveness, inventiveness, elaboration, sensitivity, and above all, the subjective qualities in each student's work. |
| 4. build self-confidence by | showing appreciation of each student’s strong points, establishing atmosphere in which it is safe to practice "watched only by friends", protecting each student's dignity and freedom. |
| 5. assess each student's progress and needs (after student have gone) by | dating and numbering work by each student and comparing with his or her previous work, include these observations in activity log; photograph and score key work |
| 6. set the stage for transfer by | making the art experience so rewarding that students will spontaneously use what they learn for their own purposes in their own ways in situations elsewhere |
page 137.
Copyright 1980/1996 Rawley Silver